

Industry News
How to Choose the Right Radial Bristle Disc Color and Grit
Choosing the wrong radial bristle disc color wastes time and ruins expensive precision jewelry. This guide solves that problem instantly. We use a simple 3-step decision method to help you pick the exact right tool. Learn how to choose based on your processing stage, material hardness, and workpiece geometry.
Are you still unsure which color combination or stacking setup suits your specific manufacturing or jewelry process? Contact our technical experts at Orobrush today. As a professional supplier and distributor of premium industrial consumables, we provide a comprehensive range of radial bristle discs in the exact specifications you need to streamline your finishing workflow.
Choosing the wrong radial bristle disc color wastes time and ruins expensive precision jewelry. This guide solves that problem instantly. We use a simple 3-step decision method to help you pick the exact right tool. Learn how to choose based on your processing stage, material hardness, and workpiece geometry.
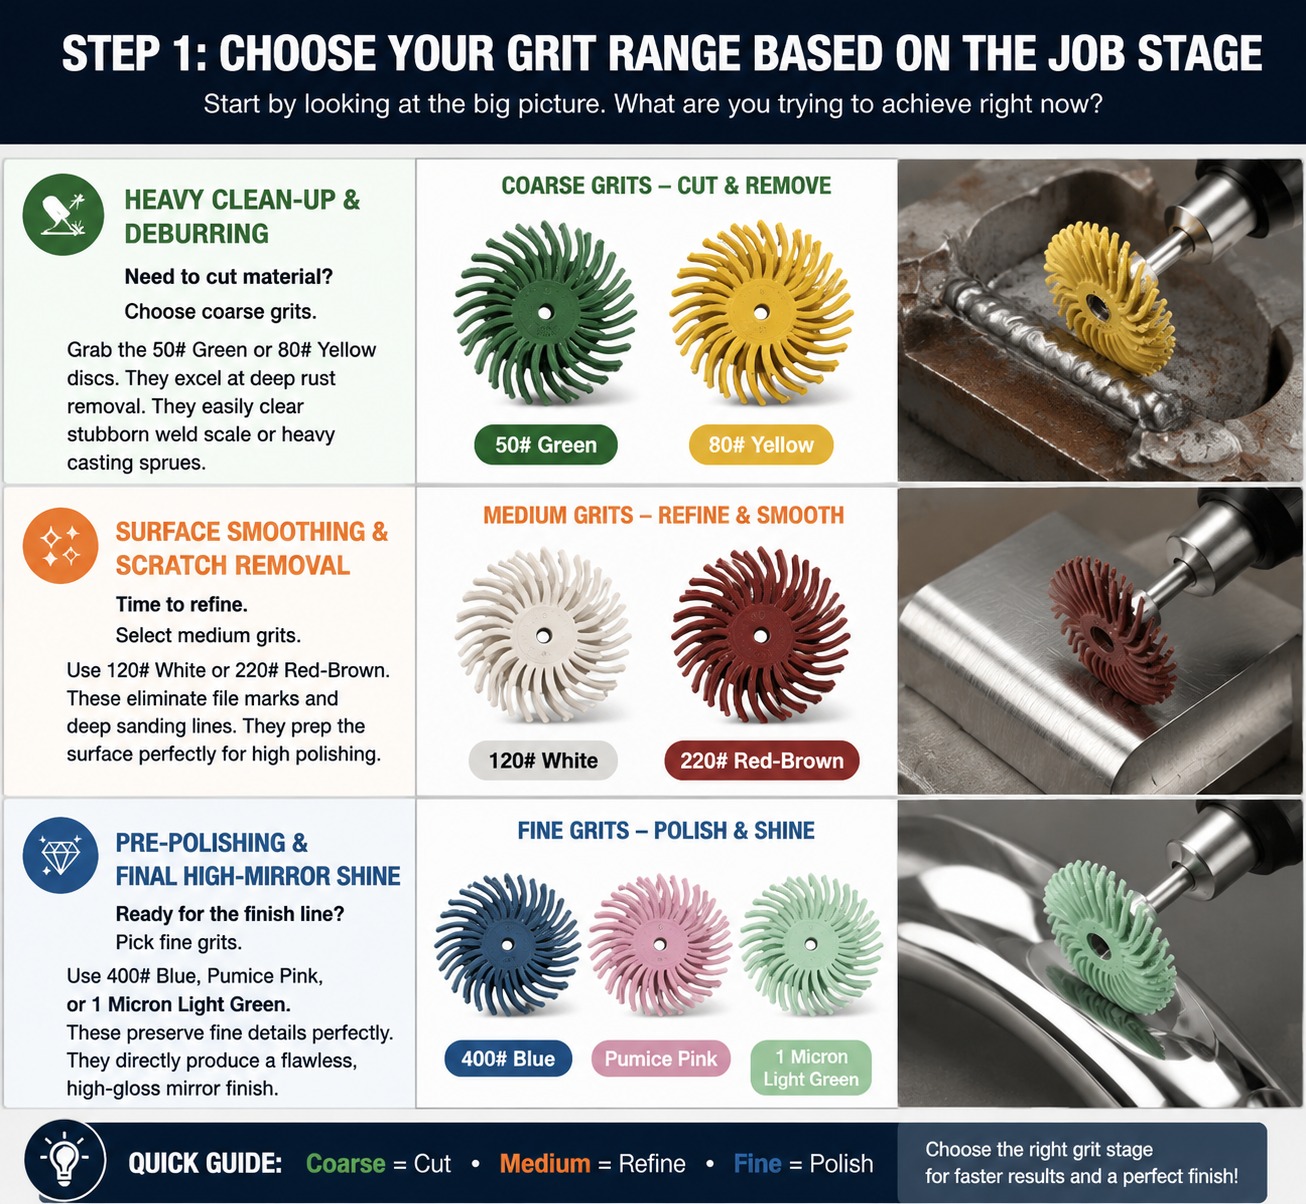
Step 1: Choose Your Grit Range Based on the Job Stage
Start by looking at the big picture. What are you trying to achieve right now?
- Heavy Clean-up & Deburring: Need to cut material? Choose coarse grits. Grab the 50# Green or 80# Yellow discs. They excel at deep rust removal. They easily clear stubborn weld scale or heavy casting sprues.
- Surface Smoothing & Scratch Removal: Time to refine. Select medium grits. Use 120# White or 220# Red-Brown. These eliminate file marks and deep sanding lines. They prep the surface perfectly for high polishing.
- Pre-Polishing & Final High-Mirror Shine: Ready for the finish line? Pick fine grits. Use 400# Blue, Pumice Pink, or 1 Micron Light Green. These preserve fine details perfectly. They directly produce a flawless, high-gloss mirror finish.
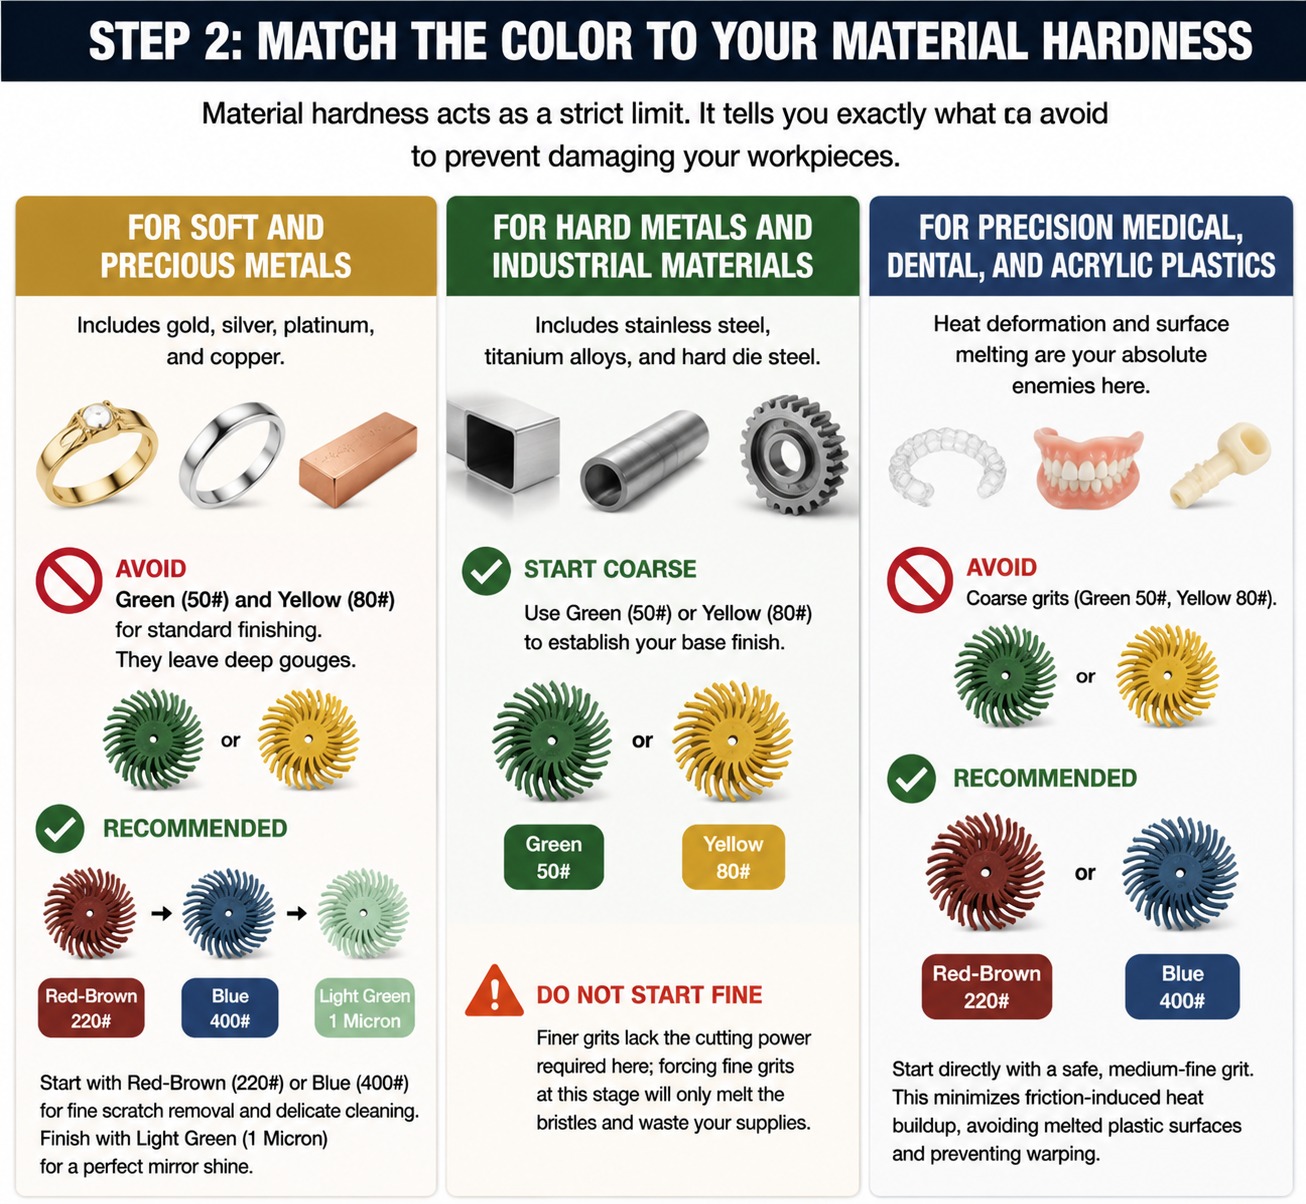
Step 2: Match the Color to Your Material Hardness
Material hardness acts as a strict limit. It tells you exactly what to avoid to prevent damaging your workpieces.
For Soft and Precious Metals
This includes gold, silver, platinum, and copper.- How to Choose: Avoid Green (50#) and Yellow (80#) discs for standard finishing. They leave deep gouges. The only exception is removing extremely rough casting sprues. For standard jewelry finishing and fine scratch removal, start with Red-Brown (220#) or go directly to Blue (400#) for delicate cleaning. Finish with Light Green (1 Micron) for a perfect mirror shine.
For Hard Metals and Industrial Materials
Think stainless steel, titanium alloys, and hard die steel.- How to Choose: You must start coarse. Use Green (50#) or Yellow (80#) to establish your base finish. Finer grits lack the cutting power required here; forcing fine grits at this stage will only melt the bristles and waste your supplies.
For Precision Medical, Dental, and Acrylic Plastics
Heat deformation and surface melting are your absolute enemies here.- How to Choose: Avoid coarse grits. Start directly with a safe, medium-fine grit. Red-Brown (220#) or Blue (400#) works best. This minimizes friction-induced heat buildup, avoiding melted plastic surfaces and preventing thin-walled dental or medical workpieces from warping.
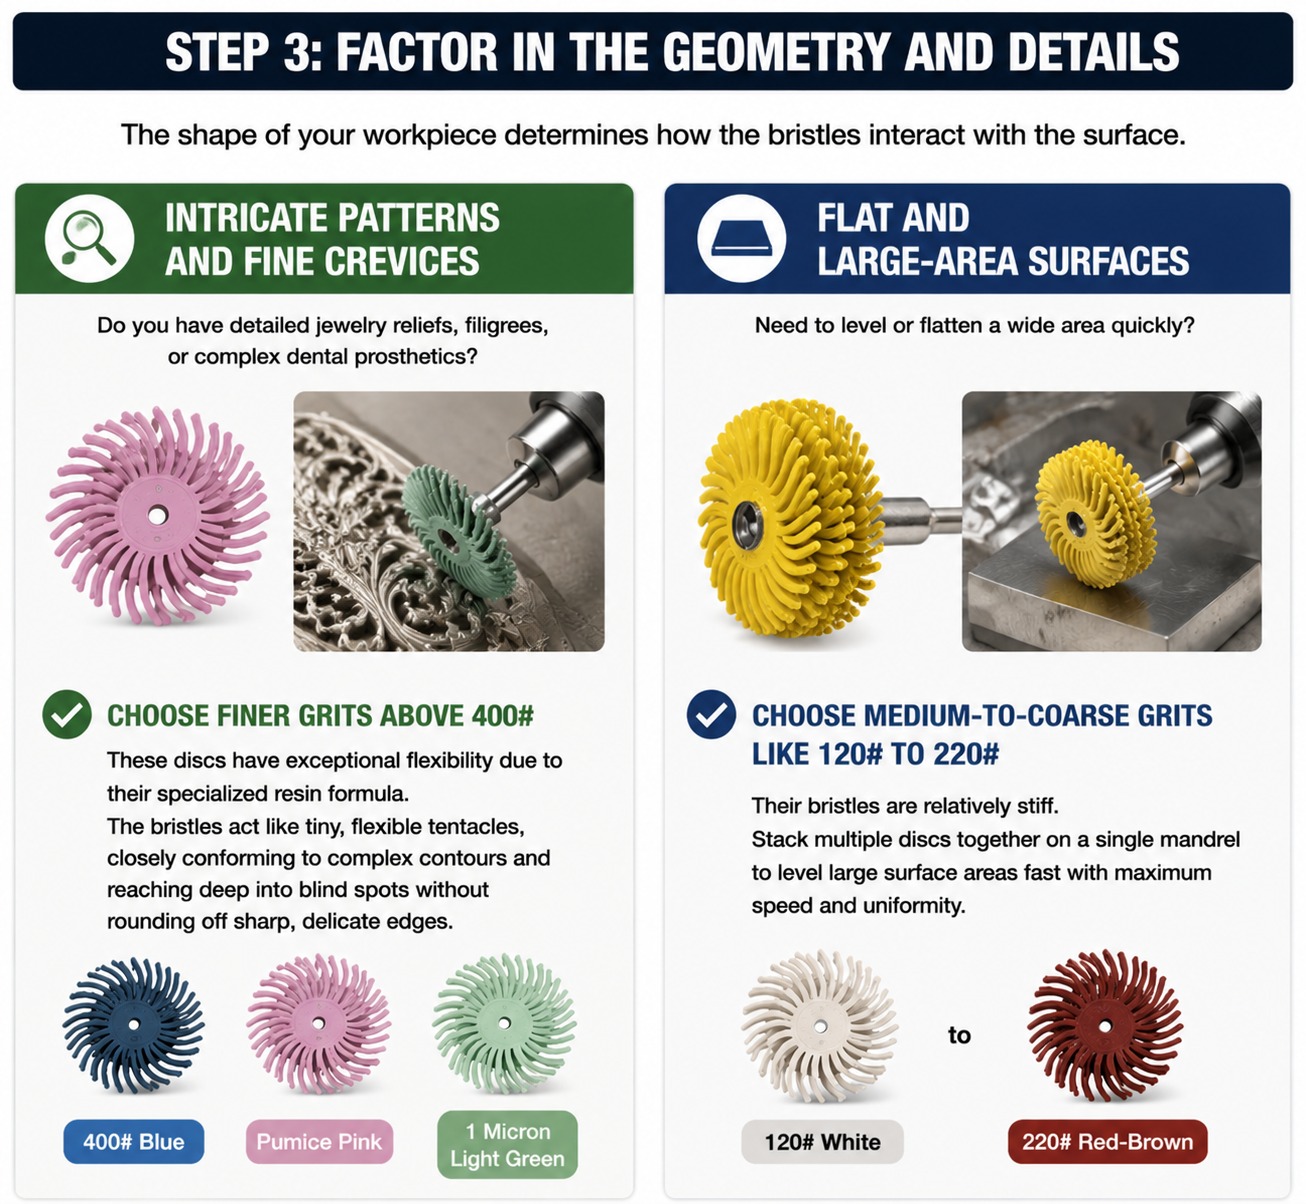
Step 3: Factor in the Geometry and Details
The shape of your workpiece determines how the bristles interact with the surface.
Intricate Patterns and Fine Crevices
Do you have detailed jewelry reliefs, filigrees, or complex dental prosthetics? Opt for finer grits above 400#. These discs have exceptional flexibility due to their specialized resin formula. The bristles act like tiny, flexible tentacles, closely conforming to complex contours and reaching deep into blind spots without rounding off sharp, delicate edges.Flat and Large-Area Surfaces
Need to level or flatten a wide area quickly? Select medium-to-coarse grits like 120# to 220#. Their bristles are relatively stiff. Stack multiple discs together on a single mandrel to level large surface areas fast with maximum speed and uniformity.The Ultimate Selection Cheat Sheet
Use this quick table for daily reference. It matches color, grit, and your exact application.| Color | Grit | Best Used For | Alternative To |
| Green | 50# | Heavy-duty deburring of stainless steel; severe weld seam cleaning | Coarse File / Wire Brush |
| Yellow | 80# | Removing heavy casting sprues; deep rust and scale removal | Coarse Sandpaper / Hard Grinding Head |
| White | 120# | Removing moderate scratches; preliminary industrial surface smoothing | Medium Sandpaper |
| Red/Brown | 220# | Removing fire scale from precious metals; eliminating file marks | Fine Sandpaper / Fine File |
| Blue | 400# | Cleaning intricate jewelry patterns/details; pre-polishing surface prep | Nylon Polishing Wheel / Medium Scrunge |
| Pink | Pumice | Semi-finishing and pre-treatment for mirror finishes without altering geometry | Medium-Fine Polishing Compound |
| Light Green | 1 Micron | Final step: achieving a high-gloss, scratch-free mirror finish directly | Polishing Paste / Cotton Buffing Wheel |
Golden Rules to Get the Best Results
Selecting the right radial polishing wheels is only half the battle. Precision technique ensures maximum tool life and safety.- Direction Matters: These discs are strictly directional. Always check the directional arrow stamped on each disc. The bristles must sweep and trail behind the machine's rotation direction. If mounted backwards, they poke the metal, causing the bristles to snap instantly and destroying the disc.
- Light Pressure Only: Do not press hard. Radial bristle discs rely on high-speed centrifugal force, not manual muscle. Heavy pressure will not speed up material removal; it only creates excessive friction, melts the bristles, and leaves black marks on your workpiece. Let the tips do the work.
- Stacking for Control: Never use a single disc. Always stack 3 to 4 discs of the exact same color together on a single mandrel. This massively increases the contact surface area, prevents bending, and ensures uniform, highly efficient finishing.
- Mind the RPM: Control your speed for safety and optimal results. While the absolute maximum limit for micro-discs (under 1 inch) is 30,000 RPM, the optimal working speed for precision jewelry, dental alloys, and plastics is between 5,000 and 15,000 RPM. Lowering the RPM prevents heat buildup, extends bristle life, and gives you far greater control over delicate details.
Conclusion
To review the core summary: Your processing stage determines the grit's starting point. Material hardness dictates your coarse limit. The workpiece geometry decides how flexible your disc setup needs to be.Are you still unsure which color combination or stacking setup suits your specific manufacturing or jewelry process? Contact our technical experts at Orobrush today. As a professional supplier and distributor of premium industrial consumables, we provide a comprehensive range of radial bristle discs in the exact specifications you need to streamline your finishing workflow.
Choosing the wrong radial bristle disc color wastes time and ruins expensive precision jewelry. This guide solves that problem instantly. We use a simple 3-step decision method to help you pick the exact right tool. Learn how to choose based on your processing stage, material hardness, and workpiece geometry.